In an age of connectivity, identifying IP addresses within your network is crucial for maintaining, managing, and protecting your network infrastructure. Your network may include printers, routers, IoT devices, computers, and servers. Trying to identify them manually can be daunting, as it may take time and be error prone. Thus, you need an efficient solution to scan IP addresses.
How to Scan a Network for All IP Addresses?
Scanning a Network With IP Scanners
1. SolarWinds IP Address Manager (Free Trial)
4. SolarWinds Network Performance Monitor (Free Trial)
What Is an IP Address and What Is Its Purpose?
This post will show you how to scan your network for IP addresses and guide you on the six best tools you can use.
How to Scan a Network for All IP Addresses
To scan your network for IP addresses before employing dedicated IP scanners, you can use a few manual methods requiring you to tinker with your terminal. But first, you’ll need to identify the IP address range to scan. For instance, you may want to scan IP addresses from 192.168.1.1 to 192.168.1.254.
After determining the range, some of the popular ways include the following:
- You can use Address Resolution Protocol (ARP) scanning, a command line utility that sends requests to all IP addresses on the network and captures their response. By capturing their responses, you can find out the IP addresses. The arp-scan also returns MAC addresses and other details of the discovered devices. You achieve this by running the command arp-a on your terminal or command line.
- Or you can use Nmap, which is an open-source port scanning tool. Nmap lets you scan the network for devices by probing a range of IP addresses for open ports. Here’s an example of how you can do that:
nmap -p 1-65535 192.168.1.0/24
- You can also do an Internet Control Message Protocol (ICMP) ping sweep where you send an echo request (ping) to a range of IP addresses established initially. Now you’ll determine the IP addresses based on the response. A positive response identifies the active device on the network by returning the IP address. To scan the network for devices, run the following command in your terminal or command line:
#windows
for /L %i in (1,1,254) do @ping -n 1 -w 100 192.168.1.%i | find “time=”
#macos
for i in {1..254}; do ping -c 1 -W 100 192.168.1.$i | grep ‘time=’; done
#linux
for i in {1..254}; do ping -n 1 -w 100 192.168.1.$i | grep ‘time=’; done
The result is a list of IP addresses that respond with “time=” between 192.168.1.1 to 192.168.1.254.
While these are basic methods to scan a network for IP addresses, consider using dedicated network scanning tools. These tools give you flexibility, advanced features, and functionality like reporting capabilities and visual representation, thus enhancing how you scan the network for devices.
Scanning a Network With IP Scanners
Often, you need more than running a command on your terminal, as this gives you limited control over the results and the commands you can run. You need a dedicated tool that’ll automate the process and give you a visual interface to tinker with.
To scan a network for IP addresses using an IP scanner, you can follow these steps:
- Pick one of the best IP scanners listed below, depending on your needs.
- Then you’ll need to download the IP scanner from its official website, follow the installation instructions depending on your system, and launch it.
- Some scanners may require you to set up configurations like the IP address range and network subnet you want to scan.
- Choose the scan type you want. IP scanners allow you to scan the network for devices and gather different information on these devices. So you may choose from an ICMP (ping) scan, a Simple Network Management Protocol (SNMP) scan, or a MAC address scan.
- Start the scan. The IP scanner will send a scan request in the defined range depending on the scan type.
- Analyze the results based on the response results.
6 Best IP Scanners
While the concept of “best” can vary based on individual needs and preferences, below are some widely recognized IP scanners that are reliable and popular among network administrators.
1. SolarWinds IP Address Manager (Free Trial)
SolarWinds IP Address Manager (IPAM) is one of the best IP scanners that offers a comprehensive IP address management solution with powerful scanning capabilities. It helps network administrators efficiently scan the network for IP addresses, track IP usage, and ensure network reliability.

©2023 SolarWinds Worldwide, LLC. All rights reserved.
Learn More Download Free Trial
Some of its key features include:
- IP scanning: SolarWinds IPAM offers robust IP scanning capabilities by performing scheduled and on-demand scans to identify active IP addresses, detect new devices, and track changes in the network infrastructure.
- IP address management: IPAM provides centralized management of IP addresses, allowing administrators to organize and track IP address allocation, subnet utilization, and address assignments.
- DHCP and DNS integration: IPAM seamlessly integrates with DHCP and DNS services, providing a unified view of IP address allocation and ensuring consistency between IPAM and these critical network services.
- Alerting and notifications: The tool offers customizable alerts and notifications, enabling administrators to stay informed about IP address conflicts, subnet capacity issues, or unauthorized IP address usage.
- IP address tracking: IPAM provides historical tracking of IP addresses, allowing administrators to monitor IP usage trends, identify IP address overlaps, and track changes. This feature aids in capacity planning, troubleshooting, and compliance audits.
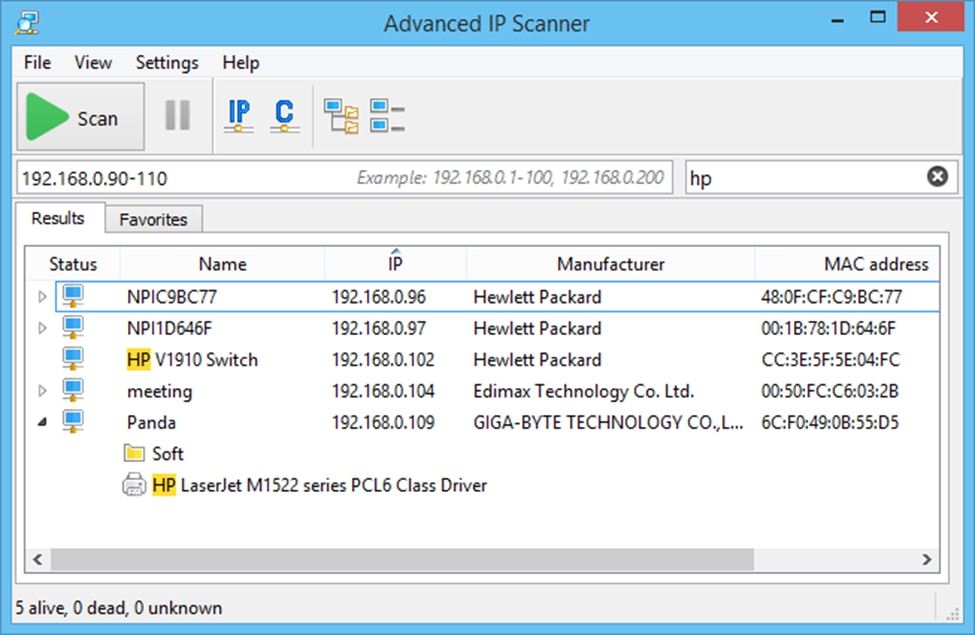
2. Advanced IP Scanner
Advanced IP Scanner is a popular IP scanning tool that helps network administrators discover and scan a network for devices. It offers a range of features designed to simplify IP address scanning and monitoring tasks.
Copyright © 1999-2023 Famatech Corp. All rights reserved.
Here are the key features that make it one of the best IP scanners:
- Advanced IP Scanner performs fast and reliable network scanning to identify connected devices. It scans IP and MAC addresses to detect active devices on the network.
- It offers remote control and administration of devices discovered on the network. Thus, you can remotely access and manage devices using Remote Desktop Protocol (RDP) and Secure Shell (SSH).
- Advanced IP Scanner includes port scanning functionality, allowing you to check the open ports on discovered devices. This feature helps identify potential vulnerabilities and assists in network security assessments.
- The Wake-On-LAN feature allows administrators to wake up devices remotely within the network. It sends a signal to a device’s network interface card to power it on, facilitating remote access and management.
Advanced IP Scanner is free to use. However, it’s primarily designed for Windows operating systems.
3. Angry IP Scanner
Angry IP Scanner is a cross-platform, open-source IP scanning tool that helps network administrators scan IP addresses within a network. It offers a range of features designed to simplify network scanning and provide essential information about connected devices.

Angry IP Scanner maintained by angryziber
Below are the features that make it one of the best IP scanners:
- Angry IP Scanner allows you to customize the scanning parameters, such as specifying a range of IP addresses or scanning specific ports.
- It’s compatible with various operating systems, including Windows, macOS, and Linux.
- Angry IP Scanner can perform port scanning to identify open ports on devices. It can also detect the services running on those ports, providing valuable information about the devices’ functionality and potential vulnerabilities.
- Angry IP Scanner allows users to apply filters to the scan results, making focusing on specific devices or IP ranges of interest easier.
Angry IP scanner is free to use.
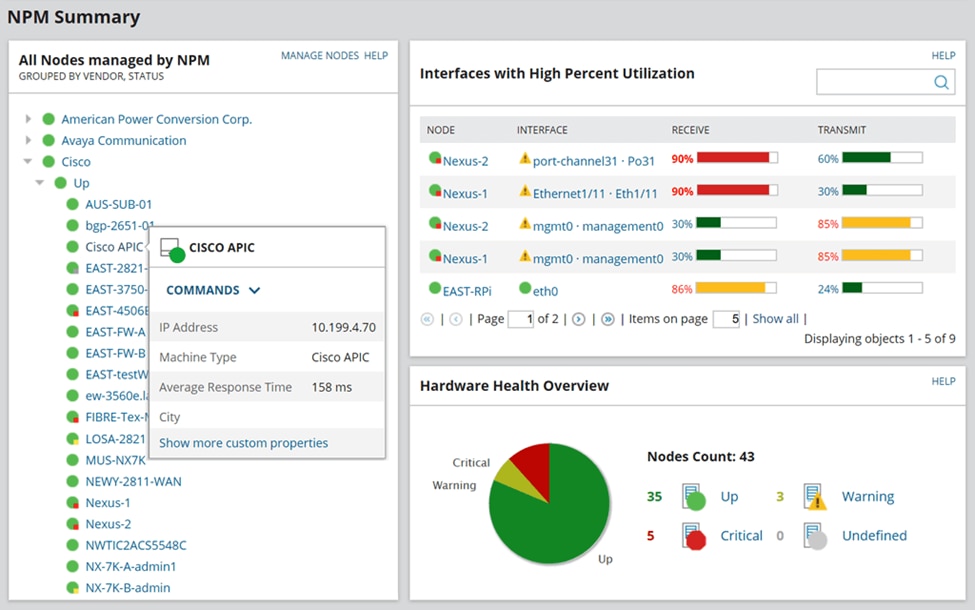
4. SolarWinds Network Performance Monitor (Free Trial)
SolarWinds Network Performance Monitor (NPM) is not primarily an IP scanner. It’s a comprehensive network monitoring and management tool that provides many features to monitor and optimize network performance. While NPM includes some IP scanning capabilities, its primary focus is monitoring network devices, applications, and traffic.
©2023 SolarWinds Worldwide, LLC. All rights reserved.
Here are the key features of SolarWinds NPM:
- Device monitoring: NPM monitors the health and performance of network devices, including routers, switches, firewalls, servers, and more. It monitors device availability, response time, CPU and memory usage, and other performance metrics.
- Network traffic analysis: The tool analyzes network traffic patterns and bandwidth utilization, helping administrators identify bottlenecks, congestion, and bandwidth-hungry applications. It offers insights into traffic patterns, protocols, and data transfer rates.
- Alerting and notifications: NPM provides customizable alerts and notifications based on predefined thresholds or specific network conditions. It can notify administrators via email, SMS, or other methods when issues or performance deviations occur, allowing for timely response and troubleshooting.
- Network mapping and visualization: The tool provides graphical network maps, illustrating the relationships between devices, subnets, and connections.
Learn more Download Free Trial
5. Paessler PRTG
Paessler PRTG is a comprehensive network monitoring tool offering IP scanning capabilities and a wide range of features to monitor and manage network infrastructure.
Here are the key features of Paessler PRTG:
- IP scanning and discovery: PRTG Network Monitor allows administrators to scan IP addresses to discover and identify devices on the network.
- Real-time monitoring: The tool offers real-time monitoring of network devices, servers, applications, and services. It provides performance metrics such as availability, bandwidth utilization, response times, and health status. This helps administrators identify issues and bottlenecks in the network.
- Network maps and visualization: The tool provides network maps and visual representations of network topologies, allowing administrators to understand the relationships between devices, connections, and subnets.
- Remote probes: PRTG Network Monitor supports remote probes, allowing administrators to monitor distributed networks and remote locations. This is useful for organizations with geographically dispersed networks.
Paessler PRTG gives you an unlimited 30-day trial, after which you revert to the free version, but you can always upgrade to a paid license.
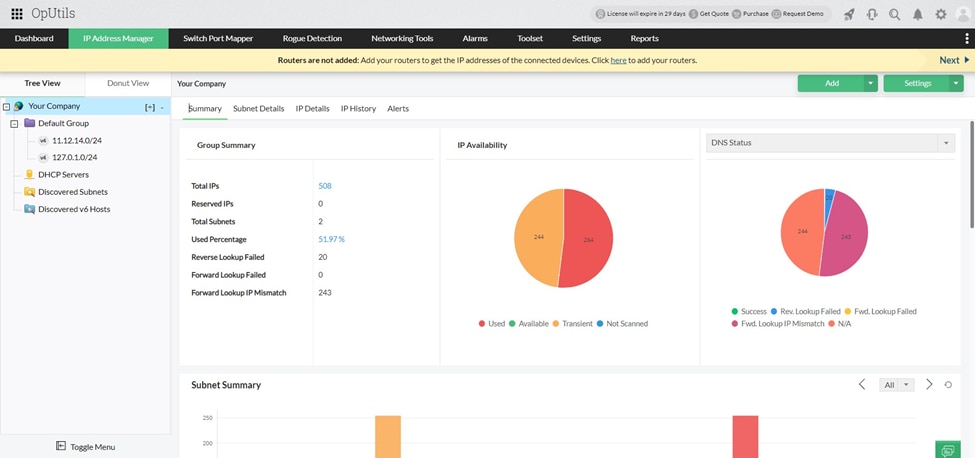
6. ManageEngine OpUtils
ManageEngine OpUtils is a network management tool with IP scanning capabilities, offering comprehensive IP address management, switch port mapping, and monitoring features. Its user-friendly interface and integration with the ManageEngine Suite make it one of the best IP scanner tools for efficient IP address management and basic network monitoring tasks.
© 2023 Zoho Corporation Pvt. Ltd. All rights reserved.
Here are the key features of ManageEngine OpUtils:
- IP address management allows you to track and scan IP addresses within your networks, ensuring efficient IP address allocation and avoiding IP conflicts.
- The tool can detect MAC addresses associated with IP addresses, providing information about the physical devices connected to the network.
- OpUtils includes a switch port mapper feature that identifies the switch ports to which devices are connected.
- The tool monitors the availability and performance of IP addresses within the network.
- OpUtils includes a subnet calculator that assists in subnetting and IP address planning.
What Is an IP Address and What Is Its Purpose?
An Internet Protocol (IP) address is a unique numerical identifier for devices connected to a network. Devices that connect to a network may include computers, smartphones, and IoT devices or any other networked device that are given a unique IP address. This enables these devices to send and receive data over the network.
IP addresses facilitate the routing of data packets across the internet. When you send data from one device to another, it is broken down into bite-sized packets, each tagged with source and destination IP addresses (think of it as a client sending a request to a server). As a result, the network devices and protocols leverage this information to determine where to transmit the packets effectively.
An IP address has two sections: one identifies the network and the other the device.
IP addresses come in two versions: IPv4 (Internet Protocol version 4) and IPv6 (Internet Protocol version 6). An example of an IPv4 address is 192.168.80.1, while an IPv6 example is 2001:0db8:85a3:0000:0000:8a2e:0370:7334.
IPv4 vs. IPv6
IPv4 is a 32-bit address with a dotted decimal notation that divides the address into four sets of numbers separated by periods. These decimal numbers range from 0 to 255. Here’s an example of a commonly used IPv4 address: 192.168.0.1.
IPv4 originally defined address classes (Class A, B, C, D, and E) to allocate address ranges for different network sizes. However, classless addressing and subnetting replaced the class scheme to allow flexible IP address allocation.
IPv4 has approximately 4.3 billion unique addresses, given that it is a 32-bit format address. However, with the explosive growth of internet access and connected devices, this address type’s availability has quickly depleted, thus prompting the creation and adoption of IPv6.
To cope with the increasing demand for more IP addresses, IPv6 was developed. IPv6 uses a 128-bit addressing scheme, which increases the IP address pool.
IPv6 is represented using the hexadecimal notation, represented using eight sets of four hexadecimal digits separated by colons. For example, 2001:0db8:85a3:0000:0000:8a2e:0370:7334 is a valid IPv6 address.
Besides increased address space, IPv6 has a simplified header structure compared to IPv4, improving routing efficiency and network performance. Also, IPv6 incorporates the stateless address autoconfiguration, which allows devices to generate their IP addresses depending on the network prefixes.
Further, IPv6 includes built-in support for Internet Protocol Security (IPsec) that gives native encryption, authentication, and integrity verification of network communication.
While IPv4 has been the primary protocol for a long time, adopting IPv6 is essential for addressing the growing demand for IP addresses. However, transition mechanisms like dual-stack deployment running both IPv4 and IPv6 protocols concurrently, tunneling (encapsulating IPv6 packets within IPv4), and translation (converting IPv6 packets and vice versa) ensure coexistence between the two protocols.
How to Assign IP Addresses
Assigning IP addresses involves allocating unique numerical labels to devices connected to a network. The process typically includes two methods: static IP assignment and dynamic IP assignment through Dynamic Host Configuration Protocol (DHCP).
Static IP Assignment
Assigning a static IP address involves manually configuring a specific IP address for a device. You’ll commonly use this method for devices that require a consistent, unchanging IP address.
Here are the steps to assign a static IP address:
- Determine an IP address not currently assigned to any other device on the network.
- Connect to the device and navigate to its network settings.
- Specify the chosen IP address, the subnet mask, and the default gateway in the network settings.
- Configure the Domain Name System (DNS) server addresses if necessary.
- Once you’ve entered all the network settings, save the changes and apply the new static IP configuration.
Dynamic IP Assignment
Dynamic IP assignment is a more automated method that relies on a DHCP server to assign IP addresses to network devices dynamically. DHCP simplifies managing IP addresses and ensures efficient address utilization. Here’s how it works:
- Configure a DHCP server on the network, typically within the router or a dedicated server. The DHCP server leases and manages IP addresses for connected devices.
- On the devices that will receive dynamic IP addresses, set the network settings to get an IP address automatically (usually referred to as “Obtain an IP address automatically” or “DHCP enabled”).
- When a device connects to the network, it sends a DHCP request to the DHCP server, requesting an IP address. The DHCP server checks its available pool of addresses and leases one to the requesting device.
- The DHCP server assigns an available IP address from its pool to the device, along with the subnet mask, default gateway, and other relevant network configuration details.
Duplicate IP Addresses
Duplicate IP addresses occur when two or more devices on the same network have the same IP address. This situation can cause network conflicts and communication issues.
When devices attempt to communicate over the network, conflicts arise because the network infrastructure does not know which device with the duplicate IP address should receive the incoming data. This results in intermittent or complete loss of network connectivity for the devices involved.
To avoid duplicate IP addresses, use network monitoring tools like SolarWinds IPAM that’ll detect and notify you of IP address conflicts. Maintaining accurate network documentation, including IP address assignments and configurations, can also help prevent duplicate IP address issues.
Conclusion
IP scanners allow you to discover, monitor, and manage IP addresses within a network. They provide valuable information about connected devices, detect open ports, and aid in troubleshooting a network. Different IP scanning tools offer various features and capabilities, such as SolarWinds IP Address Manager (IPAM) for comprehensive IP address management, Advanced IP Scanner for fast and customizable scanning, and Angry IP Scanner for open-source flexibility.
Regardless of the tool you choose, leveraging IP scanners enhances network visibility, helps prevent IP conflicts, and improves overall network performance and security.
This post was written by Mercy Kibet. Mercy is a full-stack developer with a knack for learning and writing about new and intriguing tech stacks.
Leave a Reply