As with most things in life, doing things right with SQL Server from the very first step makes it much easier to manage in the future. In this article, we’ll look at five important things you should verify after installing SQL Server. These are in no particular order but more of a mindmap based on years of experience. Making sure to verify these things will make your life as a DBA more relaxing after handing the server over to the application team post-installation.
Step 1: Create maintenance plans
One of the most common problems with disasters is that they always seem to happen on the most critical server. Imagine a crisis unfolding and then thinking, “I wish I would have taken a backup”.
To avoid this very bad situation, make sure to do the following on every SQL Server instance after installation:
- Backup: Full, differential and transaction log (if applicable). The frequency of backup should be determined by the application team as a part of the SLA from the database team. Make sure the backups are also scheduled to go off the server on regular basis. What’s the point of having a backup locally on the server? What if it goes to a state from where it can never boot up? Keeping backups at a safe location keeps life much easier.
- Integrity check: It is better to detect database corruption as soon as it appears. Maintenance plans having “CHECKDB” can help. Also, someone needs to actually take a look at the output. The good news is that the ERRORLOG has a summary of CHECKDB output so regularly checking ERRORLOG can help.
- Index and statistics maintenance: If you have worked on performance troubleshooting, you will ikely agree that much of the time updating statistics with full scan or rebuilding indexes will resolve many issues. Wouldn’t it be nice that this was done automatically? As a DBA, you should create a plan as a part of post-installation.
- Cleanup: Maintenance plans history in MSDB database and report files on operating system can cause a lot of wastage in disk space. The cleanup tasks are provided in the maintenance plan to avoid such issues.
Step 2: Check and set sp_configure values
This step is often missed after installation. Here are a few values that are very critical to change as per application.
- Max Server Memory: If this is not configured, SQL Server would try to consume as much memory as it wants, which would cause a memory crunch for other applications and the operating system itself. Leave about 15% for the operating system and give the rest to the SQL Server instance, provided there are no other instances of SQL Server on the machine.
- Max degree of parallelism: By default, the value for this setting is zero, which must be set based on the type of application using the SQL Server instance installed. If it’s going to be pure OLTP, then the general recommendation is to set the value to 1 or ½ or ¼ of the physical cores available on the server. If its non-OLTP, then check with your application team about which setting they recommend. Leaving it to zero is not a good choice.
- Other settings: Based on usage and after consulting your application team, xp_cmdshell, SQLCLR, and OLE Automation might need to be enabled.
Step 3: Instant file initialization
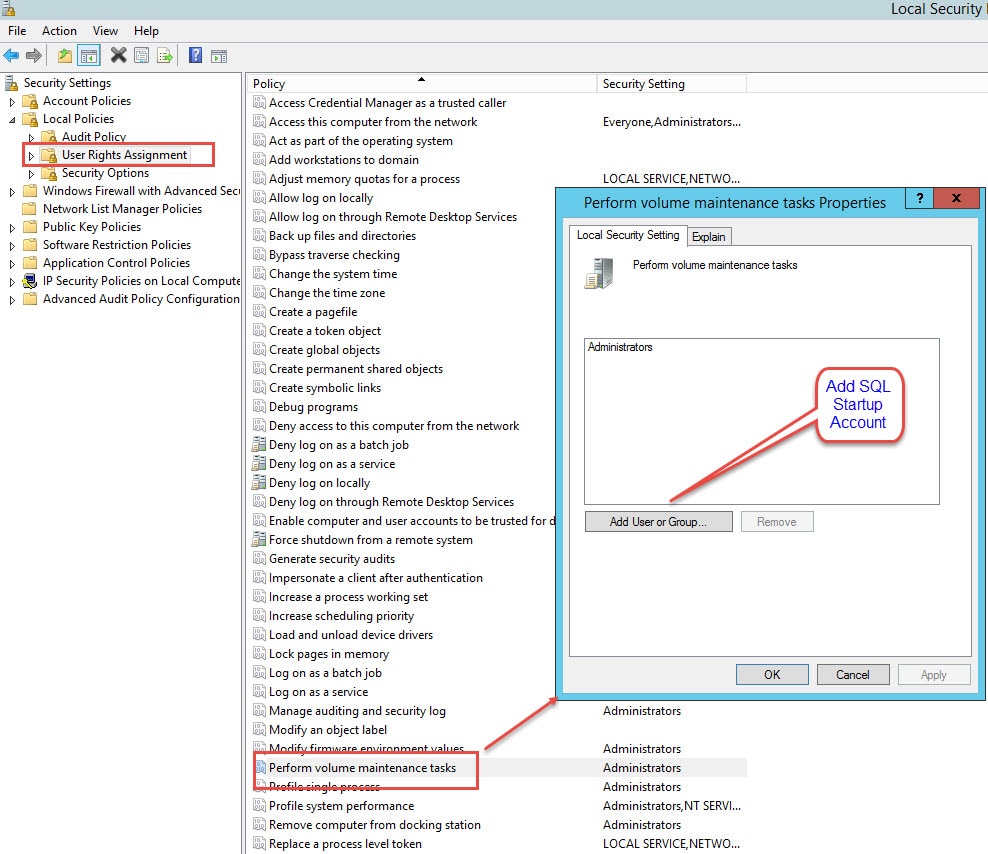
This feature enabled faster restore, faster auto-growth, and faster creation of database having huge file sizes. This is done by giving “Perform volume maintenance tasks” (or SE_MANAGE_VOLUME_NAME) permission for the SQL Server startup account. This permission keeps SQL Server from “zeroing out” new space when it creates or expands a data file (not transaction log files).
To give permission, go to Start > Run > SecPol.msc. Then go to “Local Policies” > “User Rights Assignment” > “Perform volume maintenance tasks” as shown below.
Step 4: Make sure permissions are not given to “everyone”
In many situations, a DBA might add the “Everyone” account to various shares and permissions because this can seem easier. This is generally OK on a test server, but for a production SQL Server, you should be much more limiting in giving such permissions. In this case, ideally, the “Everyone” user will be removed from non-Windows drive (C drive).
Step 5: System database
Based on the usage of SQL Server, there are many recommendations possible for the system database:
- TempDB: Create more data files equal to ½ or ¼ the physical CPUs. This is important for those types of load which use TempDB on heavy basis, either by user tables or system objects. All files should be of same size and same growth. You also need to enable trace flag 1117 and 1118 as startup parameters. Having multiple LDF has no advantage.
- Model: If there are plans to create more databases on this instance later, then a model has to be configured so that the new databases are using best practices for settings. You can choose 2 GB data file size and 512 MB log size. You should set auto-growth of fixed size rather than 10%. In general, 512 MB growth is good for model database files, which would be inherited by newly created databases.
Depending on your specific SQL Server deployment, there will likely be many other items on your list. However, if you pay attention to these five items, you will be able to avoid some common issues in the future.

these are the most important things post sql server installation that we need to consider.Everything must be done including the permission access shared across the users.