Note: This article is the second of a three-articles series. Read the first part here: Partition Tables – Ways to Improve Performance in your SQL Server Environment. This article is focused on implementing the techniques from in the first article, and checking the query performance in the environment.
All the storage process begins with creating a database. Any database is created into a Default filegroup, otherwise you set the other place in the creation process. Also it’s possible to change to another filegroup in any time moving from the original place.
To create a database and set the Filegroup Primary, you should name the .MDF file. Also the Transaction LOG should be name in .LDF file. Look for the code bellow, and check the full address for MDF and LDF files.
The default path is composed by SQL Server Instance name, in this case, a named instance call SQL2012. Look for the “MSSQL11.SQL2012” in full path:
C:Program FilesMicrosoft SQL ServerMSSQL11.SQL2012MSSQLDATA
Its means kind of SQL Server “.” SQL Server Instance. The kinds are about SQL Server Engine, SQL Server Analysis Services, etc.
To set the path, look for this code:
CREATE DATABASE dbMuseum_2
ON
( NAME = dbMuseum_2,
    FILENAME = C:Program FilesMicrosoft SQL ServerMSSQL11.SQL2012MSSQLDATAdbMuseum_2.mdf',
    SIZE = 10MB,
    FILEGROWTH = 10MB )
LOG ON
( NAME = dbMuseum_2_log,
     FILENAME = C:Program FilesMicrosoft SQL ServerMSSQL11.SQL2012MSSQLDATAdbMuseum_2_log.ldf',
     SIZE = 10MB,
     FILEGROWTH = 10MB ) ;
 GO
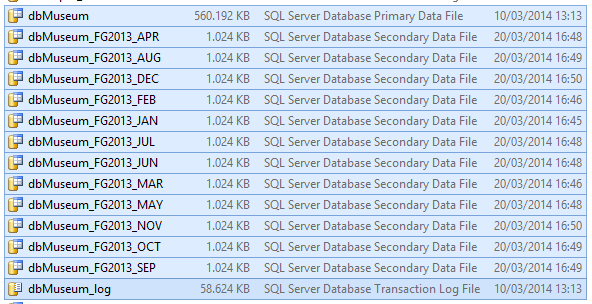
After creating this second database, check the folder to see both Filegroups there.

After checking, you can drop the dbMuseum_2 database. This just shows you how to create and set the database path.
Going back to dbMuseum created in the first article, now it’s time to create other FileGroups to split and store separated data from tbVisitors in each specific filegroup. First of all, we create some others filegroups. Use the code bellow to alter the dbMuseum Database.
USE MASTER
GO

ALTER DATABASE dbMuseum ADD FILEGROUP [FG2013_JAN]
ALTER DATABASE dbMuseum ADD FILEGROUP [FG2013_FEB]
ALTER DATABASE dbMuseum ADD FILEGROUP [FG2013_MAR]
ALTER DATABASE dbMuseum ADD FILEGROUP [FG2013_APR]
ALTER DATABASE dbMuseum ADD FILEGROUP [FG2013_MAY]
ALTER DATABASE dbMuseum ADD FILEGROUP [FG2013_JUN]
ALTER DATABASE dbMuseum ADD FILEGROUP [FG2013_JUL]
ALTER DATABASE dbMuseum ADD FILEGROUP [FG2013_AUG]
ALTER DATABASE dbMuseum ADD FILEGROUP [FG2013_SEP]
ALTER DATABASE dbMuseum ADD FILEGROUP [FG2013_OCT]
ALTER DATABASE dbMuseum ADD FILEGROUP [FG2013_NOV]
ALTER DATABASE dbMuseum ADD FILEGROUP [FG2013_DEC]
GO
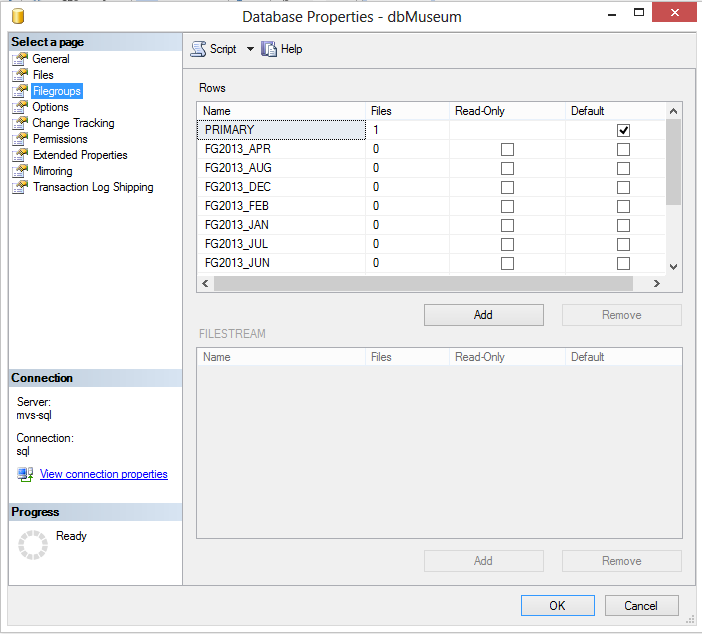
To check the logical names created, could be through Database Properties or T-SQL. To use SQL Server Management Studio, go to Database Property, than go to Filegroups in left menu.

To check those logical names through T-SQL, run this code:
USE dbMuseum
GO

SP_HELPFILEGROUP
GO
The result is the same as you see in SQL Server Management Studio, all filegroups created.
After the logical filegroups are created, the next step is make the physical files and associate with the logical filegroups. To realize this, it’s another DDL statement.
USE MASTER
GO

/* January/2013 */
ALTER DATABASE dbMuseum
ADD FILE
(NAME = 'FG2013_JAN'
,FILENAME = C:Program FilesMicrosoft SQL ServerMSSQL11.SQL2012MSSQLDATA dbMuseum_FG2013_JAN.ndf')
TO FILEGROUP [FG2013_JAN]
GO

/* February/2013 */
ALTER DATABASE dbMuseum
ADD FILE
(NAME = 'FG2013_FEB'
,FILENAME = 'C:Program FilesMicrosoft SQL ServerMSSQL11.SQL2012MSSQLDATAdbMuseum_FG2013_FEB.ndf')
TO FILEGROUP [FG2013_FEB]
GO

/* March/2013 */
ALTER DATABASE dbMuseum
ADD FILE
(NAME = 'FG2013_MAR'
,FILENAME = 'C:Program FilesMicrosoft SQL ServerMSSQL11.SQL2012MSSQLDATAdbMuseum_FG2013_MAR.ndf')
TO FILEGROUP [FG2013_MAR]
GO

/* April/2013 */
ALTER DATABASE dbMuseum
ADD FILE
(NAME = 'FG2013_APR'
,FILENAME = 'C:Program FilesMicrosoft SQL ServerMSSQL11.SQL2012MSSQLDATAdbMuseum_FG2013_APR.ndf')
TO FILEGROUP [FG2013_APR]
GO

/* May/2013 */
ALTER DATABASE dbMuseum
ADD FILE
(NAME = 'FG2013_MAY'
,FILENAME = 'C:Program FilesMicrosoft SQL ServerMSSQL11.SQL2012MSSQLDATAdbMuseum_FG2013_MAY.ndf')
TO FILEGROUP [FG2013_MAY]
GO

/* June/2013 */
ALTER DATABASE dbMuseum
ADD FILE
(NAME = 'FG2013_JUN'
,FILENAME = 'C:Program FilesMicrosoft SQL ServerMSSQL11.SQL2012MSSQLDATAdbMuseum_FG2013_JUN.ndf')
TO FILEGROUP [FG2013_JUN]
GO

/* July/2013 */
ALTER DATABASE dbMuseum
ADD FILE
(NAME = 'FG2013_JUL'
,FILENAME = 'C:Program FilesMicrosoft SQL ServerMSSQL11.SQL2012MSSQLDATAdbMuseum_FG2013_JUL.ndf')
TO FILEGROUP [FG2013_JUL]
GO

/* Augost/2013 */
ALTER DATABASE dbMuseum
ADD FILE
(NAME = 'FG2013_AUG'
,FILENAME = 'C:Program FilesMicrosoft SQL ServerMSSQL11.SQL2012MSSQLDATAdbMuseum_FG2013_AUG.ndf')
TO FILEGROUP [FG2013_AUG]
GO

/* September/2013 */
ALTER DATABASE dbMuseum
ADD FILE
(NAME = 'FG2013_SEP'
,FILENAME = 'C:Program FilesMicrosoft SQL ServerMSSQL11.SQL2012MSSQLDATAdbMuseum_FG2013_SEP.ndf')
TO FILEGROUP [FG2013_SEP]
GO

/* October/2013 */
ALTER DATABASE dbMuseum
ADD FILE
(NAME = 'FG2013_OCT'
,FILENAME = 'C:Program FilesMicrosoft SQL ServerMSSQL11.SQL2012MSSQLDATAdbMuseum_FG2013_OCT.ndf')
TO FILEGROUP [FG2013_OCT]
GO

/* November/2013 */
ALTER DATABASE dbMuseum
ADD FILE
(NAME = 'FG2013_NOV'
,FILENAME = 'C:Program FilesMicrosoft SQL ServerMSSQL11.SQL2012MSSQLDATAdbMuseum_FG2013_NOV.ndf')
TO FILEGROUP [FG2013_NOV]
GO

/* December/2013 */
ALTER DATABASE dbMuseum
ADD FILE
(NAME = 'FG2013_DEC'
,FILENAME = 'C:Program FilesMicrosoft SQL ServerMSSQL11.SQL2012MSSQLDATAdbMuseum_FG2013_DEC.ndf')
TO FILEGROUP [FG2013_DEC]
GO
To check the files in the data files folder, it should be possible to see all of them.
IMPORTANT POINT:
To take advantage in Partition Function, it’s better use different physical disks to store the filegroups. Its because each disk will store just one (or four or five) groupfiles, and the most used data should be stored in the best disks.
To make it easier to explain and show, I kept all files in the same disk.

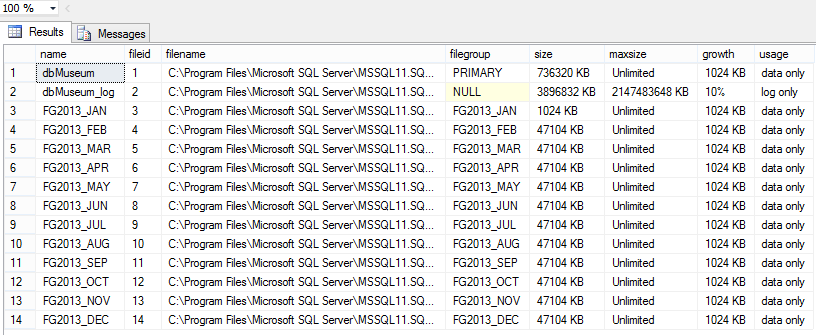
You could also check using T-SQL with the following code:
USE dbMuseum
GO

SP_HELPFILE
GO

After that, the next step is create the Partition Function, the process who will keep the algorithm to split the data. In the Partition Function, one of the most important stuff is the boundary with the range. This set put LEFT or RIGHT edge to split the data. The boundary used forces the data to keep the same range, for example, think about only two partitions, one before June/30th and another after that. If you use the RIGHT boundary, the date June/30th will be stored in first partition, it’s the same as you use a code >= ‘2013-06-30’. In other hand, if you use LEFT boundary the date will be at second partition, it’s the same use code <= ‘2013-06-30’.
Moving back to dbMuseum, split the date to RIGHT boundary for month based in the first day of each month. Look that all the data before Jan/1st will be stored at the first partition. Also all the data created after December/1st will be together in the same partition, it’s happening because there is no other partition after that.
USE dbMuseum
GO

CREATE PARTITION FUNCTION VisitorsPerMonth(date)
AS
RANGE RIGHT FOR VALUES
('20130101', '20130201', '20130301',
 '20130401', '20130501', '20130601',
 '20130701', '20130801', '20130901',
 '20131001', '20131101', '20131201')
GO
After creating those twelve Partition Functions, the next step is create the Partition Scheme and associate those Partition Functions to them. Remember the Partition Scheme is responsible to move the data to right Filegroup, based in associated Partition Function.
Pay attention in creation, because there are 13 Partition Scheme instead of 12 Partitions Functions created some minutes ago. This happens to cover the data created after Dec/1st, and this data will be stored in PRIMARY FileGroup.
To create the Partition Scheme, use the code below:
CREATE PARTITION SCHEME VisitorToFilegroup
AS
PARTITION VisitorsPerMonth TO
( [FG2013_JAN],[FG2013_FEB],[FG2013_MAR]
 ,[FG2013_APR],[FG2013_MAY],[FG2013_JUN]
 ,[FG2013_JUL],[FG2013_AUG],[FG2013_SEP]
 ,[FG2013_OCT],[FG2013_NOV],[FG2013_DEC]
 ,[PRIMARY] )
 GO
Just to learn, if you want to write all data in the same FileGroup, you could use this code:
CREATE PARTITION SCHEME VisitorsToPrimary
AS
PARTITION VisitorsPerMonth ALL TO ([PRIMARY])
GO
The last step is create (or modify the original table, as well) and populate this table. To keep the study, I’ll create a new table and move the data from original one to the new one. I’ll do this to future compare the results between queries against both designs. Run the code to create and populate the new table.
CREATE TABLE tbVisitors_2(
	[id] [int] IDENTITY(1,1) NOT NULL,
	[name] [varchar](50) NULL,
	[date] date NULL
) ON VisitorToFilegroup([date])

INSERT INTO tbVisitors_2(name, [date])
SELECT name, [date] FROM tbVisitors
GO
After some time, the new table is created and populated. Check that the rows are writen in each specific filegroup. You could check this by running this code to see the files.
SP_HELPFILE
GO

Compare the column size, and check the filegroups growing size. It’s happening because there are rows inside!
To compare performance between both designs, run this code:
SET STATISTICS IO, TIME ON
GO
SELECT name, date FROM tbVisitors WHERE [date] = '2013-01-15'
SELECT name, date FROM tbVisitors_2 WHERE [date] = '2013-01-15'
GO
Seeing the Message area, in the result set, it’s possible check the number of Scan Count and Logical Reads for both. Compare by yourself the numbers decreasing with the new design.
/*------------------------
select name, date from tbVisitors   where [date] = '2013-01-15'
select name, date from tbVisitors_2 where [date] = '2013-01-15'
------------------------*/
SQL Server parse and compile time:
   CPU time = 0 ms, elapsed time = 0 ms.
SQL Server parse and compile time:
   CPU time = 0 ms, elapsed time = 0 ms.

(30617 row(s) affected)
Table 'tbVisitors'. Scan count 9, logical reads 70730, physical reads 0, read-ahead reads 0, lob logical reads 0, lob physical reads 0, lob read-ahead reads 0.

 SQL Server Execution Times:
   CPU time = 1813 ms,  elapsed time = 397 ms.
SQL Server parse and compile time:
   CPU time = 0 ms, elapsed time = 0 ms.

(30617 row(s) affected)
Table 'tbVisitors_2'. Scan count 1, logical reads 5788, physical reads 0, read-ahead reads 0, lob logical reads 0, lob physical reads 0, lob read-ahead reads 0.

 SQL Server Execution Times:
   CPU time = 109 ms,  elapsed time = 665 ms.
In the next article, I’ll cover the benefits to use this architecture structure to compare inserts in this table, but with the ColumnStore Index in there.
[…] second article in this series will cover creating all steps about the Partition Table, and checking the Logical […]