With every release of SQL Server, Microsoft brings unique ways to solve the business problem. SQL Server 2014 is one such release, in which various new features were introduced which makes it truly world class enterprise level RDBMS engine.
In this article, we explore a feature introduced in SQL Server 2014 called Managed Lock Priority. If we look at typical maintenance activities which a DBA must carry out on any OLTP system, they would certainly include online index rebuild and switch partition. Due to the nature of locks taken by both of these, there might be blocking on a highly transactional OLTP environment. Both take Schema modification (SCH-M) locks, which are incompatible with all other locks. This can be verified from the lock matrix available in Books Online; for example, SCH-M is in conflict with everything.
To solve this problem, SQL Server 2014 introduces a new feature that gives DBAs the ability to specify one of several different manageability options to handle the DDL locks of online index rebuild. There are three options available:
- Switch to normal queue: Wait for blockers and after the wait time (MAX_DURATION) expires place the lock in the regular lock queue (as it does today)
- Exit DDL after wait: Wait for blockers and after the wait time expires (MAX_DURATION) exit the OIR without any action
- Kill all blockers: Enforce the online index rebuild by killing all blockers immediately or after a specified wait time (MAX_DURATION =n [minutes])
These options are possible because a new lock queue was introduced in SQL Server 2014 called Low Priority Lock Queue, and that is why it doesn’t interfere with regular user workloads.

We should remember few salient points:
- MAX_DURATION is not the duration of the operation itself. It is the maximum wait. The name is little confusing because a DBA might think this is the duration of the operation and can be used to avoid long running rebuild.
- A very high value in MAX_DURATION should not be used because it prevents the transaction log from truncating from the point the DDL was submitted until it is executed. The max value possible is 49 days. So unless we have the transaction log drive space to support 49 days worth of transactions, we should keep the MAX_DURATION lower.
Let’s look at the following example to understand the low priority wait queue and the behavior with all three options.
-- create new database
create database managedlockprioritydemo
go

-- create a table in database create earlier
use managedlockprioritydemo
go
create table mydemotable
  (
     id     int,
     name   varchar(100),
     age	int,
     constraint pk_mydemotable primary key (id)
  )
go

-- populate
set nocount on
go
declare @counter int
set @counter = 1
while @counter <= 10000
  begin
      insert into mydemotable
      values      (@counter,
                   'name' + convert(varchar(10), @counter),
                   @counter*100 )
      set @counter = @counter + 1
  end
go
set nocount off
go
The above script would take around 60 seconds.
Option 1: ABORT_AFTER_WAIT = NONE (Switch to normal queue)
You can run the queries shown below to have a look at the behavior.
Query 1
-- query 1: taking shared lock and holding it.
use managedlockprioritydemo
go
begin tran
select count(*) 'count'
from   mydemotable (holdlock)
where  id <= 9000

select @@spid '@@spid'
-- rollback tran
Once query 1 is started, we will run query 2 in another query window.
Query 2
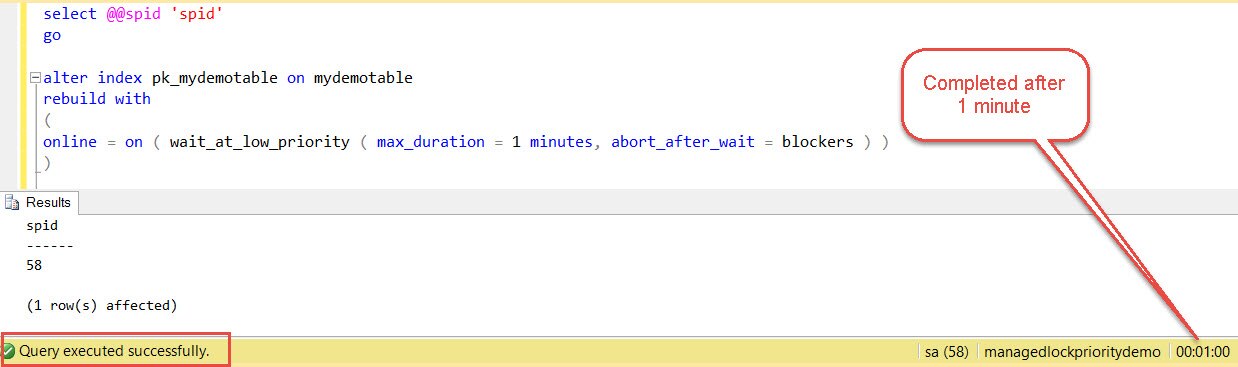
select @@spid 'spid'
go

alter index pk_mydemotable on mydemotable
rebuild with
(
online = on ( wait_at_low_priority ( max_duration = 1 minutes, abort_after_wait = none ) )
)
We need to make a note of the SPID in each query. In my case, query 1 was SPID 54 and query 2 was SPID 58.
If we look at blocking using the query below:
select session_id, blocking_session_id, wait_resource, wait_time, wait_type
from sys.dm_exec_requests where session_id = 58 -- this is the SPID from query 2
Here is what we would see:

After 1 minute, which we have specified in alter index query, we will see this:

This confirms that online index rebuild switched to normal queue and would wait.
Option 2: ABORT_AFTER_WAIT = SELF (Exit DDL after wait)
When this option is provided, ALTER INDEX would exit by itself if the lock is not acquired. You can now cancel query 2 in the earlier example and run it again with this new option.

As we can see the time, exactly after 1 minute we got the error shown below:
Msg 1222, Level 16, State 56, Line 4
Lock request time out period exceeded
Option 3: ABORT_AFTER_WAIT = BLOCKERS (Kill all blockers)
As explained earlier, due to this option, SQL Server is going to kill all blockers. We can run the same commands as above, but now using this option. We would notice that the command got succeed after waiting for 1 minute. (Please note that ALTER INDEX waited for 1 minute because there was a session blocking it.)
If we come back to the connection which was running query 1 and try to execute anything, we would get this error:
Msg 0, Level 20, State 0, Line 9
The connection is broken and recovery is not possible.  The connection is marked by the server as unrecoverable.  No attempt was made to restore the connection.
SQL Server ERRORLOG would have information about the closing of this connection.
2015-02-15 15:41:00.350 spid58       An 'ALTER INDEX REBUILD' statement was executed on object 'mydemotable' by hostname 'SQLHOST', host process ID 15308 using the WAIT_AT_LOW_PRIORITY options with MAX_DURATION = 1 and ABORT_AFTER_WAIT = BLOCKERS. Blocking user sessions will be killed after the max duration of waiting time.

2015-02-15 15:42:00.570 spid58       An ABORT_AFTER_WAIT = BLOCKERS lock request was issued on database_id = 5, object_id = 565577053. All blocking user sessions will be killed.

2015-02-15 15:42:00.570 spid58       Process ID 54 was killed by an ABORT_AFTER_WAIT = BLOCKERS DDL statement on database_id = 5, object_id = 565577053.
I hope this article has given you an understanding of this new feature introduced in SQL Server 2014. Please make sure to use this in your maintenance plans to maximize concurrency and reduce downtimes.
Leave a Reply