One essential task of any database administrator is to make sure the data is protected from loss. This is accomplished by regular backup and test restorations of your database. When disaster strikes (and it will, make no mistake about that), you will be better equipped to deal with it if you perform these backup and restore actions described.
The MySQL distribution comes with a utility called mysqldump that can be used to back up an entire database and/or individual tables from a database to a text file. Besides the obvious need to back up your data, this action is also useful if you need to export your database contents to a different RDBMS, or if you simply need to move certain information from one system to another quickly and easily. Here is an example of this, using mysqldump to export the contents of a database in XML format.
[user@host]# /usr/local/mysql/bin/mysqldump --user=john --password=hoonose
db1
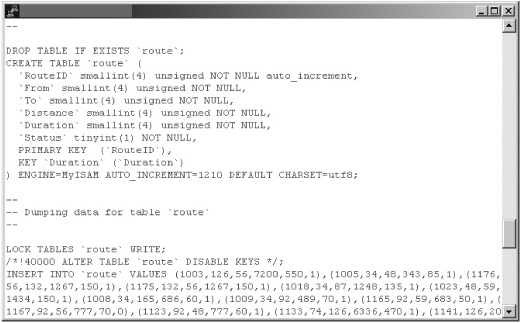
This procedure displays the contents of the entire example database, db1, on your screen. The output should look similar to Figure 1.
Notice from Figure 1 that SQL statements are included in the output of mysqldump to facilitate rebuilding tables. As with the mysql command, you need to use the –user and –password options to designate an authorized user and password to perform the dump function.
FIGURE 1 The output of the mysqldump command
TIP
If the data you are backing up has been corrupted, it is a best practice to execute a DROP TABLE or a DROP DATABASE command before restoration. This creates a clean slate for your restoration. Fortunately, the mysqldump utility does this for you; if you look at the SQL statements resulting from a call to mysqldump, you will see these commands included.
What if you don’t need the entire database to be dumped? A simple change enables you to specify which tables from within the database should be backed up. Here’s an example:
[user@host]# /usr/local/mysql/bin/mysqldump --user=john --password=hoonose
db1 route flight
This command dumps only the contents of the db1.name and db1.address tables.
In the real world, you’ll want to save the output of mysqldump to a file, not watch it scroll by on a console. On both UNIX and Windows, this can be accomplished via the > redirection operator, as shown in the following example:
[user@host]# /usr/local/mysql/bin/mysqldump --user=john --password=hoonose
db1 route flight > mydump.sql
The result of this command will be a text file, called mydump.sql, containing the SQL commands needed to re-create the db1.name and db1.address tables.
Backing Up Multiple Databases
To back up more than one database at a time, use the –B option, as in the following example:
[user@host]# /usr/local/mysql/bin/mysqldump --user=john --password=hoonose
-B db1 db2
Note that no tables are specified in this case, because when you use the -B option to back up more than one database, the entire database will be dumped. Individual tables cannot be designated in this operation.
To back up all the databases on the system, use the shortcut –all-databases option, as shown:
[user@host]# /usr/local/mysql/bin/mysqldump --user=john --password=hoonose
--all-databases
TIP
When using the mysqldump utility, you can control the characters used to enclose and separate the fields from the column output by adding any or all of the options –fields-enclosed-by, –fields-terminated-by , –fields-escaped-by, and –lines-terminated-by. This is similar to the features provided by the LOAD DATA INFILE, and SELECT … INTO OUTFILE commands, and it is particularly useful if you need to port the dumped data into a system that requires records to be encoded in a custom format before importing them.
Backing Up Table Structures
What if you want to create a table with the same structure but different data from the one you have? Again, the mysqldump utility comes to the rescue. The –no-data option produces the same table in form, but empty of content. To see this in action, try the following command:
[user@host]# /usr/local/mysql/bin/mysqldump --user=john --password=hoonose
--no-data db1 airport > airport.sql
This generates a dump file containing SQL commands to create an empty copy of the db1.airport table.
Backing Up Table Contents
The other side of the coin is a situation where you only need the contents of a table—for example, to dump them into a different table. Again you use mysqldump, but with the –no-create-info option. This yields a file containing all the INSERT statements that have been executed on the table. What doesn’t get duplicated are the instructions for creating the table.
Here’s an example:
[user@host]# /usr/local/mysql/bin/mysqldump --user=john --password=hoonose
--no-create-info db1 flight > flight.sql
The records from the flight table are now ready to be imported into any other application that understands SQL.
Backing Up Other Database Objects
It’s worth noting that, by default, mysqldump does not back up database events or stored routines. To add these database objects to the output of a mysqldump run, add the –events and –routines options, as shown:
[user@host]# /usr/local/mysql/bin/mysqldump --user=john --password=hoonose
--events --routines db1 > db1.sql
Triggers and views are, however, automatically included in the output of mysqldump. To skip these, use the –skip-triggers and –ignore-table options, as shown:
[user@host]# /usr/local/mysql/bin/mysqldump --user=john --password=hoonose
--skip-triggers --ignore-table=db1.v_small_airports_gb db1 > db1.sql
Find out more about restoring MySQL databases here. Also, read about a solution for MySQL Backup.

Leave a Reply