Maintenance plans are one of the hidden jewels in the SQL Server tool chest that can really be a godsend to the beginning DBA or accidental DBA that is tasked to manage SQL Server. Maintenance Plans enable you to quickly and easily create scheduled backups, database integrity checks, index reorganizations and more – most of the essential tasks that you need to protect your data and keep your database running smoothly. The best part for the new or accidental DBA is that Maintenance Plans can be created quickly and easily and they can essentially be put to work in just a few minutes.
Maintenance Plans have been around since the SQL Server 7 days but they were substantially revamped in the SQL Server 2005 release. They are part of the SQL Server Standard, Business Intelligence and Enterprise editions – they require SQL Agent so therefore they are not available for the SQL Server Express Edition. Maintenance Plans can be used for regular operation including the following:
- Full database backups
- Differential database backups
- Transaction log backups
- Database integrity checks
- Index rebuild and reorganization
- Update statics
- File cleanup
Under the covers when you create a Maintenance Plan you are actually creating a SQL Server Integration Services package. That package will typically be executed on a schedule that you supply to the SQL Server Agent.
Running the Maintenance Plan Wizard
The easiest way to create a new Maintenance Plan is by using the Maintenance Plan Wizard. The wizard steps you through the basic process of creating a Maintenance Plan. To create a new Maintenance Plan using the Maintenance Plan Wizard open SQL Server Management Studio (SSMS) then expand the Management node, right click on the Maintenance Plans node and then select Maintenance Plan Wizard from the context menu. The Maintenance Plan Wizard enables you to create multi-task Maintenance Plans. You can have each task in the Maintenance Plan run on a separate schedule or they can all run on the same schedule. The Maintenance Plan Wizard displays a dialog that you can use to select the different tasks that you want to include in the Maintenance Plan. You can see an example of using the Maintenance Plan Wizard to create a new Maintenance Plan in Figure 1.

Figure 1 – Maintenance Plan Wizard
Subsequent dialogs give you the option of reordering the tasks as well as configuring each task and selecting the databases where the tasks will be run. For instance, the Back Up Database (Full) task prompts you to select the database that you want to back up as well as the backup target destination, the file extension for the backup and whether you want to use compression or encryption. The backup task is often combined with the Maintenance Cleanup Task. The Maintenance Cleanup Task can be used to delete old backup files as well as Maintenance Plan log files. By default Maintenance Plans write their results to the C:\Program Files\Microsoft SQL Server\MSSQL12.MSSQLSERVER\MSSQL\Log file but you can also set them up to email the results to you if you have configured SQL Mail.
Modifying Maintenance Plans
You can modify existing Maintenance Plans using the Maintenance Plan Designer. To modify a Maintenance Plan open SSMS then expand the Management node, expand the Maintenance Plans node and double click on the Maintenance Plan that you want to modify. This will open the Maintenance Plan Designer that you can see in Figure 2.
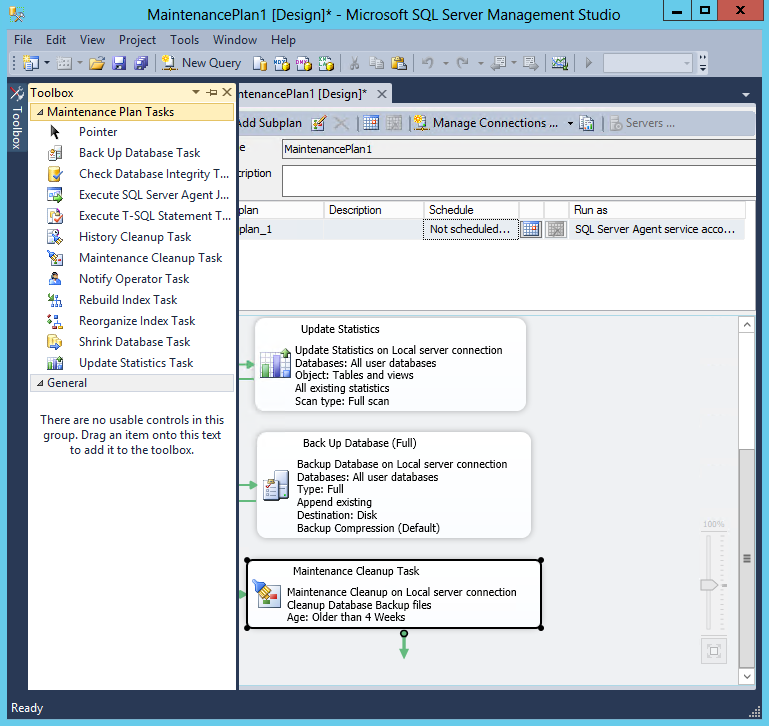
Figure 2 – Maintenance Plan Designer
The different tasks that comprise the Maintenance Plan are shown in the Designer. Green arrows link the tasks together according to their precedence. You can change any of the task’s configurations by double clicking on the task in the Designer. You can add tasks by clicking the Toolbox tab on the far left side of the window to display the Toolbox. The Toolbox contains the different Maintenance Plan tasks. You can drag-and-drop tasks from the Toolbox onto the Designer surface. You can change the Maintenance Plan schedule by clicking on the calendar icon that you can see in the upper middle part of Figure 2. When you are done making changes to the Maintenance Plan you must close the Design window and then you’ll be prompted to save the changes to the Maintenance Plan.
Viewing Maintenance Plan Run History
One of the best things about Maintenance Plans for the new DBA is that they allow you to easily view the success or failure of a plan. To view a Maintenance Plan’s run history open SSMS, then expand the Management node, right click on the Maintenance Plan that you want to view and then select View History from the context menu. This will display the Maintenance Plan history viewer that you can see in Figure 3.
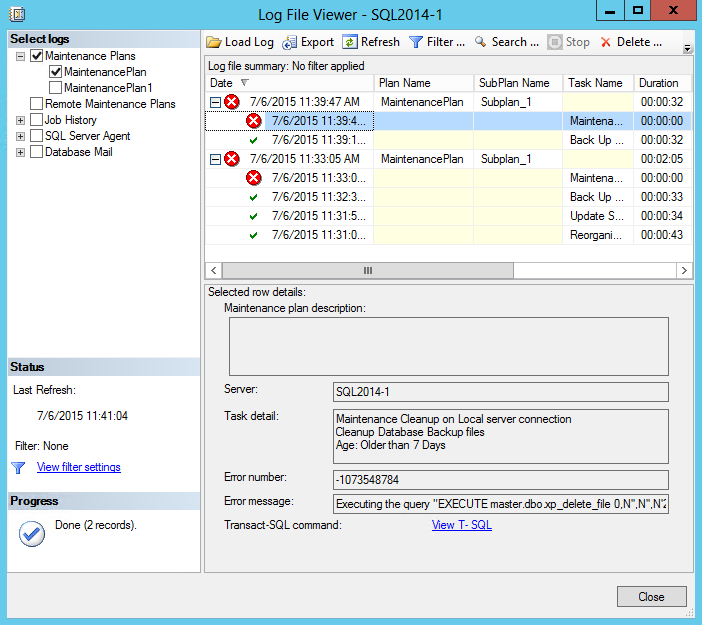
Figure 3 – Maintenance Plan History
The Log File Viewer that you can see in Figure 3 displays your Maintenance Plan run history. You select the Maintenance Plan that you want to view in the Select logs pane. This will display the run results that you can see in the Log File Viewer. If the Maintenance Plans have executed successfully there will be a green check mark. If any task in the Maintenance Plan has failed there will be a red X. You can see any error numbers and messages in the details pane shown in the lower portion of the Log File Viewer.
While Maintenance Plans don’t offer the full control or flexibility of T-SQL scripts or PowerShell they do provide an easy on-ramp for the new DBA or the accidental DBA to setup your necessary SQL Server database maintenance procedures. You can learn more about SQL Server Maintenance Plans on TechNet at Create a Maintenance Plan. If you’re looking for a more powerful and flexible alternative to Maintenance Plan you might want to check out Ola Hallengren’s scripts
Leave a Reply