All of the Oracle databases, whether physical or logical, must be created as a physical standby first. The tools used to create the standby are RMAN, Data Guard Broker, or Oracle Grid Control. Steps must be completed on both primary and standby servers. However, the steps on the primary database need to be done only once, no matter how many standby servers are being created. Separation of duties and responsibilities can come into play with the user who manages the Data Guard environment. The administration role for Data Guard is SYSDG and can be used with the Data Guard Broker to manage the standby databases. Let’s take a look at actually creating a physical standby server; RMAN provides a simple command for creating the standby database and backing up the database at the same time.
Example Project: Create a Physical Standby Server
This project will step through creating a standby database on a different server than the primary database. There are steps to be followed on both the primary and standby database server. We recommend only using a development environment to work through this project because of the parameter changes to the primary database.
Step by Step
1. Complete the following steps on the primary server:
2. Configure the redo transport authentication; use a remote login password file.
3. Add standby logfiles to the primary server. The logs on the standby server need to be the same size or larger than on the primary server in order for the primary redo to be applied to the standby redo logs.
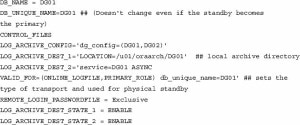
4. Set initialization parameters on the primary server:
The parameters that are set on the primary server control how the redo will be transmitted to the standby server. The LOG_ARCHIVE_DEST_1 would be set for the primary server’s archive log location even if there was not a standby server. Additional locations can be set by adding a number in place of the n for LOG_ARCHIVE_DEST_n.
5. Put the primary server in ARCHIVELOG MODE. If the database is not already in ARCHIVELOG MODE, then it will need to be restarted after issuing an ALTER DATABASE command.
6. The network configurations for the standby database need to be configured on both the primary and secondary servers. In configuring a service name, use the UNIQUE_DB name for the standby server. After setting up the listener and service on both servers, verify that the password file has been copied over and the directories for ADUMP, BDUMP, Flashback, and so on have been created.
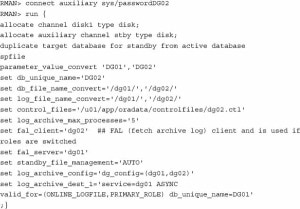
7. To create the standby database over the network on the standby server, start up the standby database in NOMOUNT mode:
8. On the primary server, issue the RMAN command and connect as sysdba:
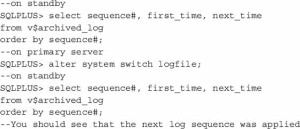
9. Log in to the primary server and switch the logfile:
10. Start the recovery process on the standby server:
11. Primary and standby servers have been created and now should be verified. To verify that the logs are being applied on the standby, queries can be executed on the standby and primary servers.
Example Project Summary
In this project, primary and standby databases were created. The configuration of the parameters and startup of the instances all need to be completed before the recovery process on the standby server starts. Following these steps should give you a good idea of what it takes to create a standby server.
To manage the Data Guard system, you can use the Data Guard Broker (DGMGRL for command line) or Oracle Enterprise Manager Grid Control. In order to use the Data Guard Broker, the parameter DG_BROKER_START needs to be set to TRUE and the LISTENER needs to have the databases with broker services added. DGMRGL is the command to invoke the broker. For Oracle Grid Control, once the database targets are added to the grid, Data Guard management is possible. These tools provide a way to fail over the database to the standby and back again to primary. They hold the configurations and allow modifications as well as managing and monitoring the Data Guard environment.


Leave a Reply